After building my first portable power station, I kept going deeper into understanding how battery, solar, and inverter systems work. Combined with access to a whole pile of barely used (yet on their way to recycling) ebike batteries, I decided to give them a second life and build a DIY powerwall out of them. The term comes from the Tesla Powerwall which is a wall-mounted battery designed to provide backup power to a whole home. What can we make ourselves?
 |
| Completed 48V parallel battery system showing 16 installed packs (of 20), charging at 18.6A |
There are already some active communities online building powerwalls out of reclaimed 18650 lithium-ion cells. They tend to take individual cells from old laptops and power tools then build them into giant packs of 80+ cells in parallel, then put 13 or 14 of those in series (you'd call this 13s80p, for example). A single giant battery with 1040 cells!
That's a huge investment to work up to one battery in the system. A problem in one area brings down the entire battery, and the increments of expansion are huge (need to reclaim another 1040 cells). So I say, why not use smaller packs wired in parallel? Especially if those packs are already professionally assembled. And especially when I have 20 of them!
A few YouTubers I've seen build parallel packs, and the emerging trend of rack-mount LiFePO4 packs is fundamentally in parallel. So it certainly can be done. I think it's safer and easier than one giant battery from loose 18650 cells. Basically, I'm making a project just like this one that puts 18 used scooter packs into a metal case with one main output.
 |
| 48V powerwall schematic |
Getting together the individual ebike battery packs
Let's start with building up the individual packs. I was lucky to have access to a number of 13s4p and 13s5p packs. The ones that had a general-purpose battery management system (BMS) didn't need any modification, they were ready to use. But some had proprietary BMSs that needed CAN communication with a motor controller to operate—those BMSs had to be replaced.
I purchased some Daly 13s 20amp Lithium-ion BMSs, and luckily they had the same balance lead connector as originally on the batteries, so the existing balance wires plugged right in.
I connected the BMS with crimp butt connectors, secured it to the battery holders with 3M VHB tape, added extra kapton tape insulation to all exposed balance contacts, then finished it off with giant heat shrink—I think it looks professional!
 |
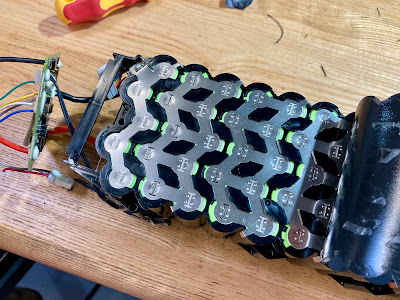
| Inside the battery pack showing the construction of (some of the) 13 rows in series with 5 cells in parallel (13s5p) |
 |
| The main power connection for the BMS. A BMS is effectively an electronic switch that is always looking for a good reason to switch off (high current, high or low voltage, unbalanced cells, etc). |
 |
| Ready to wrap with extra insulation on all the contacts for the balance leads |
 |
| Finished pack looks pretty pro! |
(Note that making a 14s lithium-ion setup would be an ideal match for most "48V" equipment. 48V inverters typically have an input range of 40-60V. Generally speaking, Li-ion cells have a 3.7V nominal voltage, empty at 3.0V and full at 4.2V. So 14s range is 42.0-58.8V, while 13s is 39.0-54.6V. A little confusing because 13s is commonly referred to as "48V" and 14s as "52V". 14s is actually the better match.)
Setting up a storage case
Now it's time to load the packs into some sort of case! Lots of builds online use different kinds of plastic toolboxes, but for better safety I wanted something made of metal. The "overlanding" community had some solutions, namely this aluminum case from Swiss Link. Fits the bill perfectly while being less expensive than Zarges, which I know are also super high quality.
 |
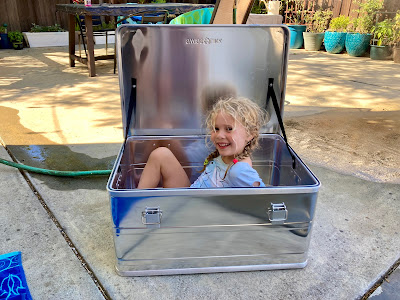
| This storage case seems big and sturdy enough! |
Wiring it up with fuses
To tie all the packs together safely I used automotive fuse blocks. That way they can all be neatly paralleled while also adding a fuse for each individual pack. Normally these fuse blocks are rated to 32V so would not be appropriate for my 13s Li-ion system with a max of 54.6V (that doesn't stop various YouTubers from using them anyway...). I contacted Blue Sea Systems and they agreed it has nothing to do with the fuse block, but rather the fuse itself.
Normal 10-cent automotive fuses are rated to 32V. Is something better available? Searching through Digikey, I found out yes! These fuses from Optifuse are rated to 58V and at $2.50 each are not cheap but still cheaper than any other solutions I found.
 |
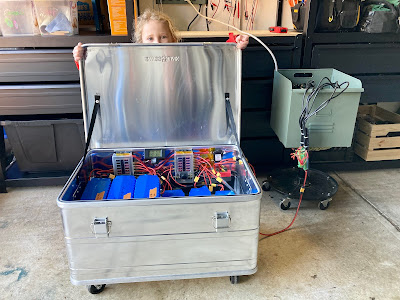
| The early wiring phase of the project, showing all of the main components in place—fuse blocks, circuit breaker, distribution bus bar. |
XT60 connectors allow easy build and maintenance of each pack (also available cheaper if you assemble the cables yourself using bare connectors and 12awg wire).
On the side of the case I installed a panel-mount female XT60 connector. For some reason, panel-mount XT90 female connectors are not available (only males are) so I made my own by 3D printing this adapter. It's important to use female connectors on power sources like batteries to minimize the chance of shorts.
I wanted XT90 for a high-power inverter connection option. XT60 is great for the charger I am building which will go up to 30A!
Power is monitored with this display that is based off of a 100A shunt. This power monitor seems great and is accurate compared to all my other meters and power supplies, but for some reason only understands current flow in one direction. I added a polarity-reverse switch on the shunt sense lines so that I can manually control when to observe current in vs out of the battery.
A 50A circuit breaker from Blue Sea Systems is the final protection point and also functions as an on/off switch for the connections external to the large metal case. It operates at up to 65VDC (the online spec sheet must have a typo, because others of the same model say 65V and so does the breaker itself) with an interrupt current rating of 7500A.
A note on fuse and circuit breaker interrupt current: All together, this pack is equivalent to 13s94p—that is, 94 cells in parallel. A single 18650 cell has a short-circuit current of around 40A, so 94 would short circuit with around 3760A. Breaker has interrupt rating of 7000A so we are all set!
Important tools for the build (these are the exact ones I use): nice terminal crimper, heat gun, clamp multimeter.
Safety
Let's review the cumulative list of safety features. Li-ion batteries are so energy dense that a problem in one cell can cascade into overheating of adjacent cells, a process known as "thermal runaway". So let's mitigate that risk as best as possible!
- Packs are from a high-quality battery assembler using high-quality cells which have not been modified from the factory in terms of individual connections or arrangement
- Each pack has a BMS (an electronic cutoff switch)
- Each pack is individually fused with a properly-rated fuse (for voltage, current, and interrupt capability)
- Combined connection in/out is through a circuit breaker which doubles as a switch to completely shut off all external connection
- All built into a metal case
- Top of the packs is lined with a bag of CellBlock Class D fire suppressant. In the event of a fire, the bag containing the CellBlock will melt and allow the fire suppressant to flow around the packs.
| Assembled battery case, on wheels, charging at up to 30A with a "super charger" that I'll write up separately. Could of course hook up a solar charge controller as well. |
Powering my house
To make normal AC power, I use this 1500W pure sine inverter. It's labeled as 48V which means it takes DC input from 40-60V (perfect for a 14s Lithium-ion system—see my note further up). I've stress tested it by running 1800W for several minutes and the whole system worked great.
To connect to the house, I use this 4-circuit manual transfer switch from Reliance Controls (catalog number 104B1, but purchased conveniently as a kit with socket and extension cable from Goal Zero). This switch allows up to four essential house circuits that I choose to be routed through so that I can choose if each circuit is powered by the grid or whatever I plug into the socket. Probably made with a gas generator in mind, but inverter and batteries works just as well, without the noise and smell.
 |
| 4-circuit manual transfer switch from Reliance Controls, installed! First time tinkering in a home electrical panel, and turns out it's no big deal. |
Capacity and Conclusion
Whew, big project! Each pack had its capacity measured by itself, so I know that putting together the 20 ebike battery packs makes the whole system weigh in at 293Ah @ 48V = 14.1kWh. That's a little more capacity than the $11,500 Tesla Powerwall which has 13.5kWh!
A more direct comparison (in terms of features and home integration capability) is the largest home backup system from Goal Zero, which includes a solar generator with expansion batteries and the same manual transfer switch as I have for powering the home. For a 2000W inverter and 10.8kWh storage they charge $8250.
What was my cost? For the inverter, transfer switch, battery case, pack wrap, BMSs, fuses, wiring, and all the rest of the little bits inside the case, it came out to about $1400. Keep in mind that I recovered the battery packs for free (but still had to modify them), so to build this yourself would be that parts cost plus whatever is spent on battery packs. I also bought some tools along the way to make things easier.
The only downside I've found to having parallel packs is that it is harder to tell if one individual pack has stopped working. You can use a current clamp to check each pack periodically, but I have yet to find a "current flow indicator" type of device for DC that does not use a shunt.
Have you built anything like this? How did it go, or what would you do differently?
Mike


love this workaround to the diy powerbank idea. any updates?
ReplyDeleteThis is a really great solution, I also have a lot of 36V batteries laying around and it wouldn't make much sense to dissasemble them and rebuild the battery from individual cells. I may try this approach in the future, if I move into a house from the apartment.
ReplyDeleteYeah that would certainly work if paired with a 36V inverter! Those are less common but they exist.
DeleteHello Mike,
ReplyDeleteThank you very much for this extremely interesting documentation. I am in the same situation as you. I have electric bike batteries and was looking for a way to use them without dismantling them. Mine are 10s4p and I am initially planning to power my devices directly with 12VDC and 24VDC (NAS, server, switches, IP camera, etc.).
I have a question about the fuse blocks: what exactly is their role? Given that each BMS manages current surges when charging or discharging each battery... Is it to protect the cable end of the fuse block to the battery? And how did you size them: max charging current, max discharging current, or max current in a 12AWG cable?
Many thanks.
Translated with DeepL.com (free version)
Hey, awesome that you are doing something similar! Please report back how it is going. 10s is an awkward config for anything besides bikes, but there are some 36V inverters out there, and of course can use buck converters for 12/24V as you mentioned.
DeleteThe fuse blocks both tie together all the parallel items and add extra fusing for safety -- basically a busbar with fuses. I chose fuse sizes to be much smaller than what is appropriate for 12AWG wire, but still more than 2-3x the max normal operating current of each battery. Big wires help keep things safer.
Note that it is a common misconception that BMSs can somehow “control” the amount of current flowing out of a battery — even a modern EV BMS is only “on” or “off”. There is nothing like the current-limited mode from a benchtop power supply. You technically could rely on a BMS for over-current protection in the case of a short, but I would recommend testing each BMS to see where it actually cuts off, and then to protect the wires they would need to be high enough gauge to safely handle that trip current. I’d rather add a quality fuse.
Great post! It’s always helpful to learn aboutproducts that improve efficiency, durability, or performance. Using high-quality components or tools can make a big difference in reliability, safety, and overall results.
ReplyDelete