Introduction
Update 2/27/17 -- To clarify, this project uses the Raspberry Pi 1 Model B
The Raspberry Pi is a cheap, multi-purpose Linux computer great for education and maker projects. It is pretty bare-bones so if you are not careful you can end up with a rat's nest of cables just to turn it on and experiment. A solution that can turn the Pi into a compact laptop-style setup is to use a Motorola Atrix or Bionic Lapdock, originally designed to dock with their line of Android phones. But why limit to a particular phone? A Lapdock is simply a nicely-packaged group of components available via USB and HDMI that you would end up connecting to your Pi separately anyway:
- Display (1366 x 768)
- Keyboard
- Trackpad
- USB hub
- Stereo speakers
- Portable battery pack
- Power supply
 |
| Raspberry Pi with Lapdock in action |
Now that some of the models of Lapdocks are discontinued you can get all of these components together in a tidy package for incredibly cheap (~$50 after selling originally for $299!). Of course, this has been done before, for example here (the original I worked from - aha! - they've updated it to be similar to mine [but they posted first]) and here. But most write-ups were done for the older version of the Pi and so involved cutting/splicing cables and some non-optimal cable lengths and cut-up connectors. What I will present here is a very clean installation with a detailed description of the best parts I could find. This should work for any Pi produced in later 2012 and on (Model B Revision 2.0 which has polyfuses F1 and F2 jumpered).
Other portable Raspberry Pi solutions have also gotten a lot of coverage, such as this one and this one. They absolutely look like fun projects but at the end of the day I feel that my version is cheaper, cleaner, easier, faster to make, and more useful. I suppose my goal wasn't to make a fancy project but rather to make it easy to do other projects on the Pi without making a mess around the house.
 |
| The completed setup |
Hardware
Lapdock
I chose the Motorola Droid Bionic Lapdock because it was cheaper by chance than the also commonly used Atrix Lapdock. My understanding is that both are identical except for the orientation of the ports where the phone would connect. Other models of Lapdocks also exist and may have since been discontinued.
Cables
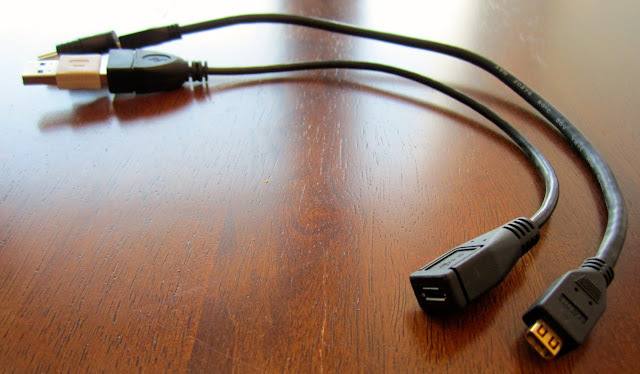
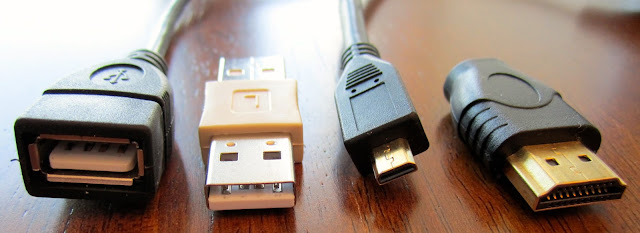
This took a lot of research. For the two cables, the required cable ends are
- USB A male to micro USB female
- HDMI male to micro HDMI female
 |
| Assembled cables -- closer ends attach to Lapdock |
 |
| Details of adapters -- close ends of adapters attach to Raspberry Pi |
Optional
I housed the Pi in one half of the Bud Industries shell case (which has two identical halves), but any case would work. Blue painter's tape attaches it simply (and robustly enough for around the house but not for travel) to the back of the Lapdock display. A USB wi-fi adapter makes the setup truly portable (and it's natively supported in the Raspbian OS).
Detailed parts info (completely simplified and updated as of 6/20/2016! I was able to find pre-made cables on Amazon with exactly the ends needed, so these aren't what are in the pictures):
| Item | Price (June 2016) |
|---|---|
| Micro HDMI Socket Female to HDMI Male Adapter Cable | $4.95 |
| USB 2.0 Micro 5 Pin Female to Standard USB Male Extension Cable | $6.50 |
| Edimax EW-7811Un 150 Mbps Wireless 11n Nano Size USB Adapter | $8.95 |
| Motorola Droid Bionic Lapdock - (this was my link but they are harder to find now--you might consider a slightly different model) | ~$50 |
Assuming you already have a Raspberry Pi, the total cost for this project is ~$65, or ~$75 with optional wifi adapter (including taxes and shipping!). Someone should tell this guy.
 |
| Enough wires and flashing lights that my wife tells me I shouldn't use it on an airplane |
Operation
The Lapdock has no power button so it is only active when it sees something connected to the HDMI port, whether that items is on or off (more on that later). Hook up the USB cable and the Pi boots up right away. The Lapdock will power on whether open or closed. An odd behavior, presumably to signal to the Android phones to go in/out of webtop mode, is that the power to the USB port temporarily cuts out when the lid is opened or closed. This pause is enough to reboot the Pi, so unless you make some hardware kludges you'll just have to choose one way or the other before booting up.
Configuration
Very little needs to be done to complete the setup. The only thing I did was modify the Rasbian config.txt file to automatically send sound over HDMI (this is how to get to the Lapdock's speakers) usinghdmi_drive=2
Battery life
With the screen on and running the Pi, the battery lasts for several hours (maybe five but I never measured carefully). With the screen closed (and thus everything powered down on the Lapdock except for the micro USB port), one could run the Pi for a very long time. But why limit yourself to plugging in a Pi? You can plug in and charge any USB device as long as the HDMI cable is plugged into something or at least has its pins shorted to ground. I used this method to charge my iPhone 4S -- a fully-charged Lapdock took the iPhone battery from 15% to 69% which is a 54% increase.Open issues and questions—feedback welcome
- The Lapdock trackpad seems to have "tap to click" permanently enabled which is infuriating, to say the least. Does anyone know a way to disable it? This post indicates the issue is the firmware inside the Lapdock so a Raspian driver probably won't cut it, unfortunately.
- Is there another way to avoid the power interruption when opening/closing the lid besides another battery or supercapacitor? As long as we are hacking the firmware to turn off tap to click, may as well fix this.
- My thumb often touches the trackpad since it is so close to the buttons -- what type of material can I place along the bottom of the trackpad to make a dead zone? Electrical tape (even five layers) didn't work.
-mschaus

Hey,
ReplyDeleteGreat post, i just ordered the same cabels as stuff as you did - lets see if it will work with the Atrix dock also :)
Again, thanx mate
You can disable/enable the trackpad easily by tapping twice on the small white light in the the upper left corner of the trackpad. I have to do it everytime I type anything of length, because my thumbs always brush the pad and cause a click.
ReplyDeleteIndeed, I was aware of this behavior but tapping on/off every time I want to switch between keyboard and mouse is almost as annoying. Ideally I would turn tap-to-click off in software (I've lost hope here) or add some material to make the bottom of the trackpad a dead zone. Any help is appreciated. Thanks!
DeleteBrilliant. Thanks for the cable links- saved me the hassle.
ReplyDeleteIve looked everywhere but the cables you referred to cannot be found?
ReplyDeleteYeah, looks like this will be a regular problem since the cables are from eBay and the listings don't last forever. I updated the links once in August 2013 but they have expired. I would just search eBay using key words from the items I linked to get the new versions of the listings.
DeleteThanks to you all for reading!
I found all of them on ebay. Most difficult to be found is the micro female to male USB A. http://www.amazon.com/gp/product/B009AWA3VK/ref=ox_sc_act_title_6?ie=UTF8&psc=1&smid=A119K31BOSN2QF
ReplyDeleteFurther question. How is being powered? Over the USB A? I thought you'd have to use a splitter of some sort as in the other video, or perhaps a battery pack?
ReplyDeleteYes, this is powered very simply over the USB A. Earlier board models and tutorials show lots of splicing (see the links in the post) but that is not required for Model B Revision 2.0 boards made in late 2012 and onward.
DeleteThanks for all the info. I have been thinking about doing this. Has it been confirmed that all of this works well with the Atrix 4G lapdock? Is the RasPi fully functional? Are there any issues?
ReplyDeleteordering these cables can make my atrix lapdock with all other raspberry alternatives? beagleboard,cupieboard2,wandboard ??? thanks in advance
ReplyDeleteI have not personally seen people do this but I see no reason why it wouldn't work. Let us know if you try! Thanks!
Deleteabout to try and find a lapdock is there a particular model i should look out for to be the best for this use thinking the 500pro as it has the connectors seperated from the tray like your model does
ReplyDeletecompute stick be like, here i come...
ReplyDelete