Saturday, December 27, 2025

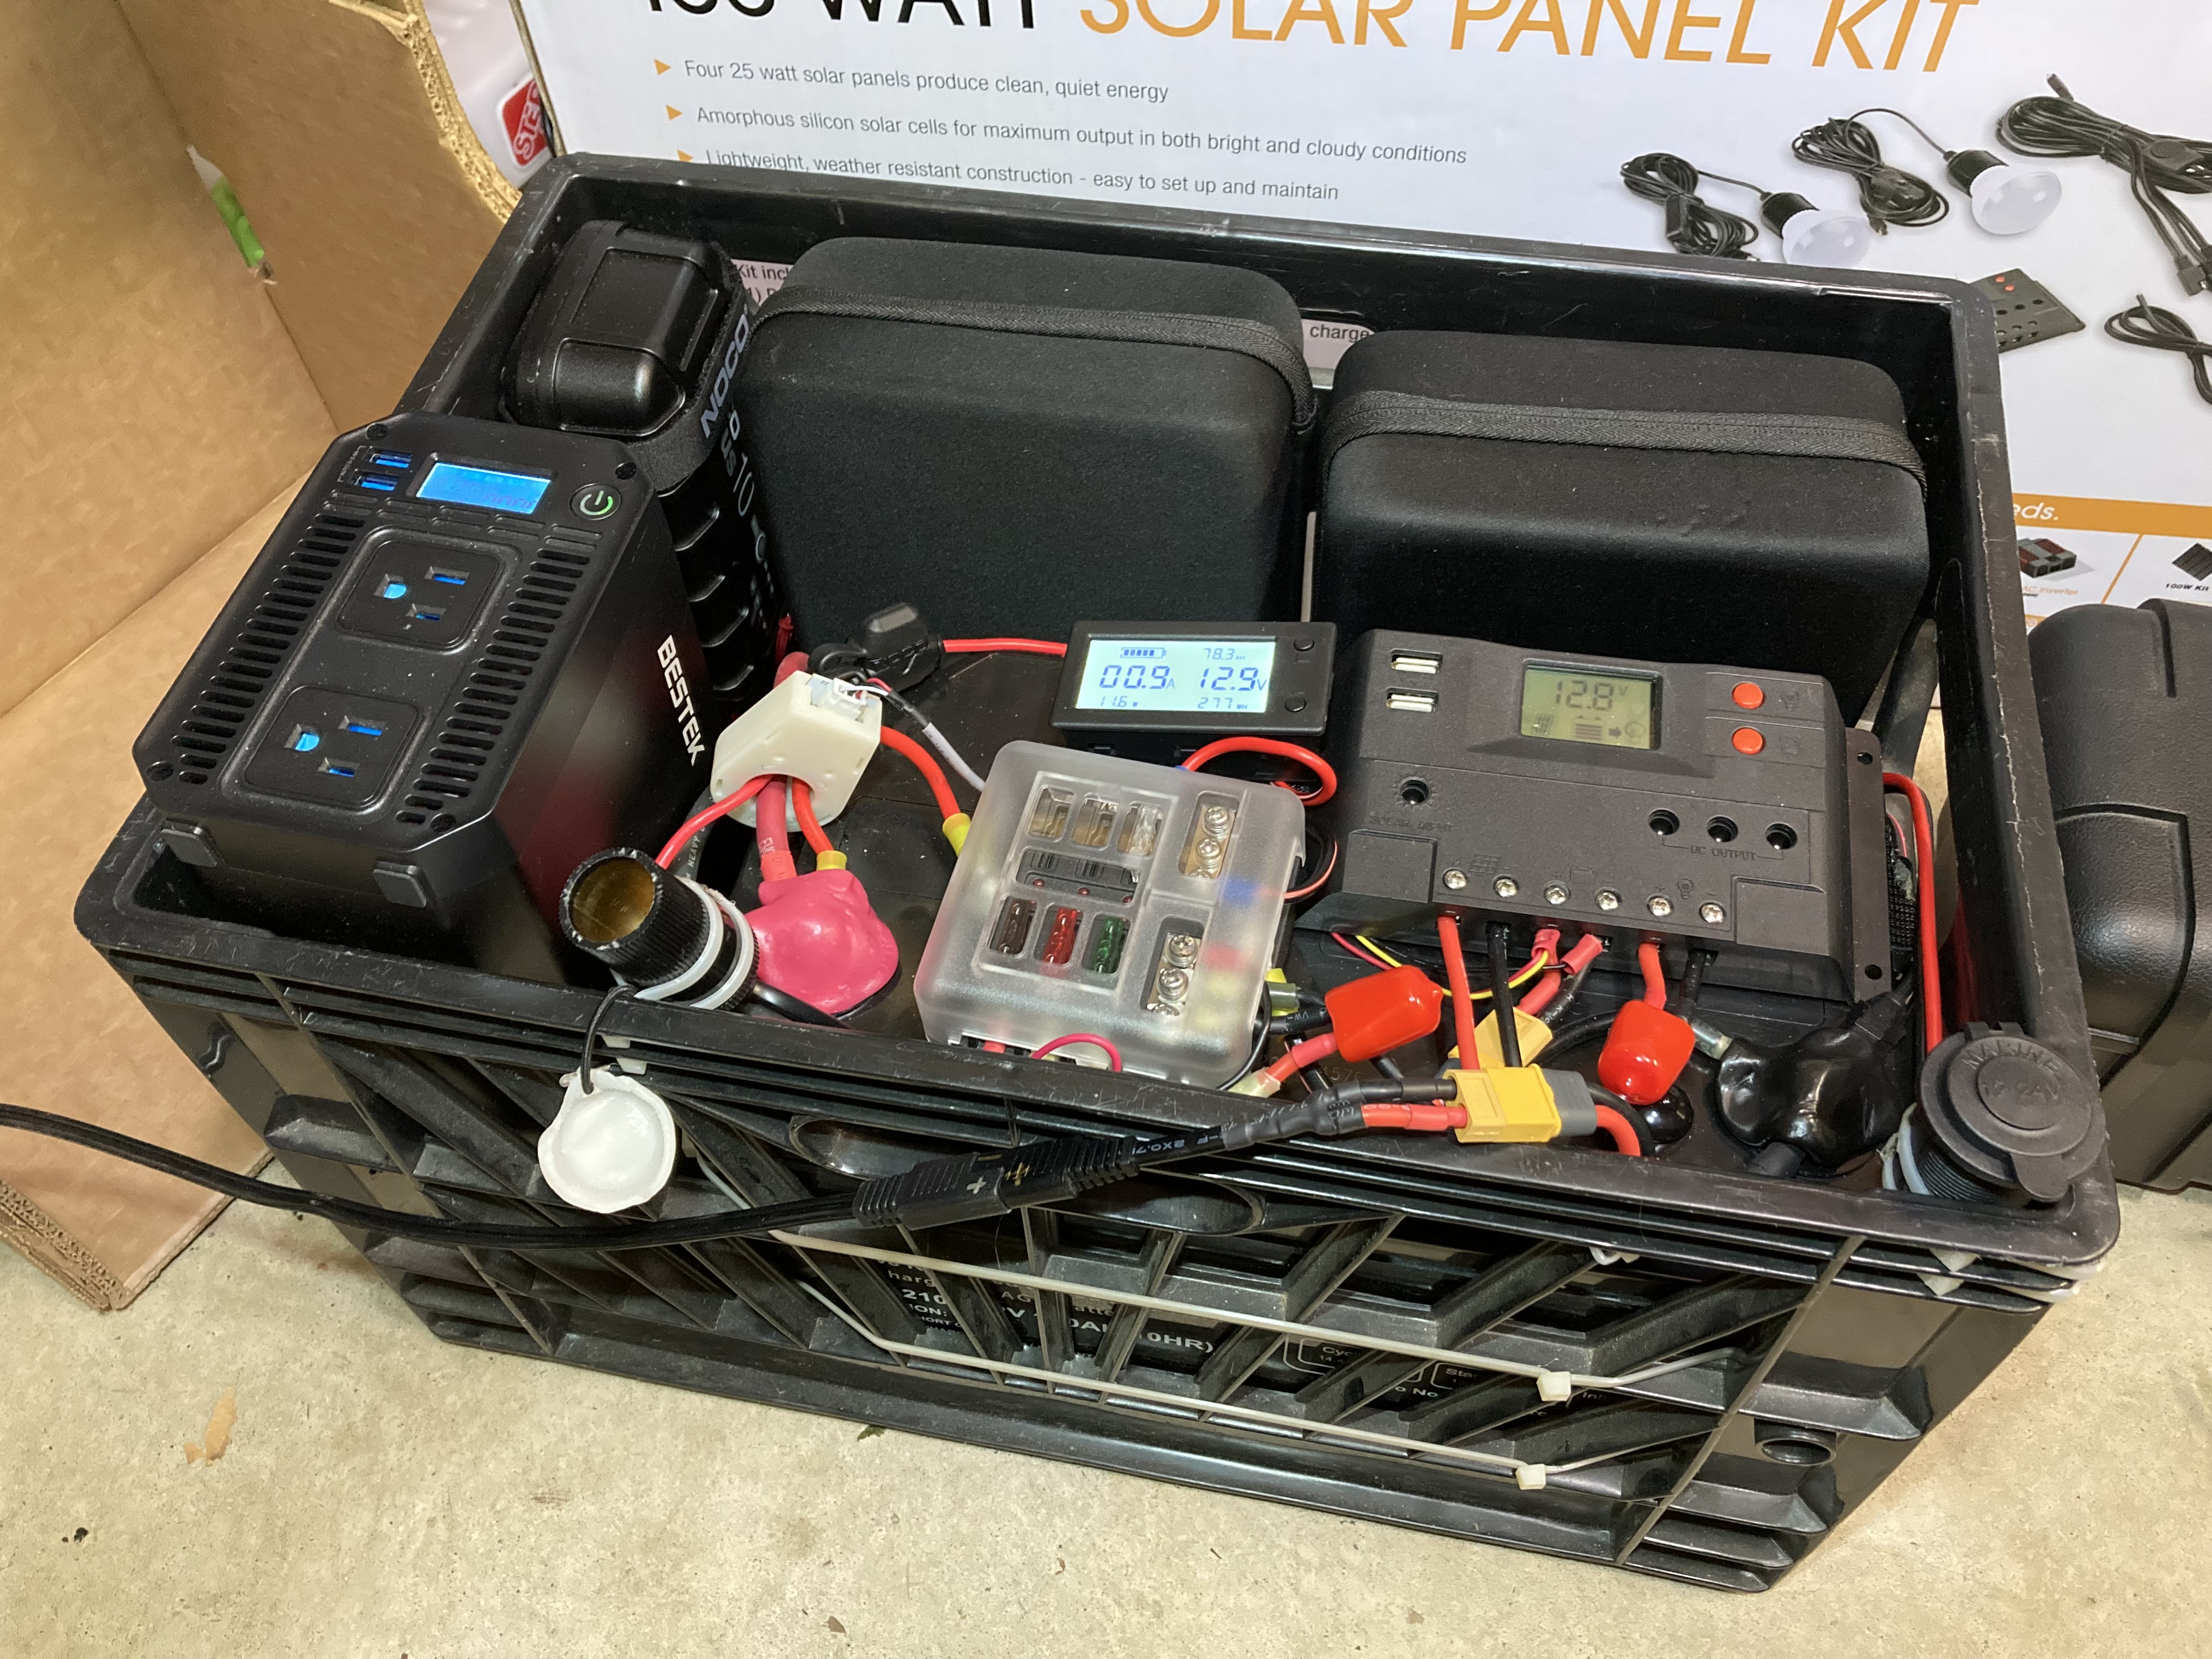
Second-gen portable power station with DIY 24V lithium-ion battery

Finally all the pieces are coming together! With my DIY 24V lithium-ion battery complete, it’s time to put it all together into a new portable solar power station and retire my original one. The original power station used a lead-acid AGM battery (60lbs alone), so was not very portable. This new one is more than double the capacity, less than half the weight, and cleanly packaged.

The goal for this project is to make a battery station that is always active and collecting power from my solar panels. This means the DIY powerwall can stay dormant most of the time for maximum safety. Once the solar battery fills up, I can dump it into the powerwall all at once with a boost converter (to go from 24V to 48V), or at any time use it to charge up my ebikes (generally also with a boost converter).

The business inside the power station
The business inside! Solar charge controller, fuse block, and power input/output ports. More details below

Tuesday, May 7, 2024

24V Lithium-Ion Battery Build for Solar Power Station

After building my first semi-portable solar power station and then DIY powerwall, I decided it was time to take my battery building to the next level. I had access to good lithium-ion cells from cancelled ebike projects, but what to make?

Design Choices

A more compact 12V system would be a natural choice, but standard nickel manganese cobalt (NMC) lithium-ion cells are not a great choice due to their voltage range (see note below). A 7S system (seven cell strings in series) works really well with 24V inverters and standard low-cost solar equipment (including charge controllers and automotive-style fuses). 7S it is!

Battery build in process
Battery build in process, showing the spot welder

Thursday, February 2, 2023

Load Sharing Between Parallel Lithium Ion Battery Packs

Now that my giant DIY powerwall has been built using parallel battery packs, the question came up about how current is shared between the different packs. Most packs are the same, but the second style of packs has a different capacity, different 18650 cell model, and different number of cells in parallel. What does this mean for current sharing between these packs as they discharge? Let’s find out!

Going into this, I suspected that the current flow from each pack would be proportional to its capacity, because if a pack is rated at X number of amp-hours, that current all needs to be delivered over the course of discharge. While in the end this was correct on average, what I did not expect was the amount of variation within the discharge curve.

To find out how the current is shared between the packs, I took one of each type (13s5p/15.4Ah and 13s4p/12.5Ah), charged them up fully, and put them in parallel. Using a DC load to discharge tells me very accurately the total current coming out of the packs, and a current meter in line with one of them lets me know the fraction coming from each pack. (The two packs must combine to total the current being drawn by the DC load).

Test setup

First, confirming that the current measurements are accurate—they are.

Showing 4A flowing from the power supply (top) to the DC load (middle). Fluke meter (bottom) is in-line and agrees. Clamp meters (right) are always a little off; this one is decent.

Wednesday, January 18, 2023

How to build a DIY powerwall using parallel ebike batteries

After building my first portable power station, I kept going deeper into understanding how battery, solar, and inverter systems work. Combined with access to a whole pile of barely used (yet on their way to recycling) ebike batteries, I decided to give them a second life and build a DIY powerwall out of them. The term comes from the Tesla Powerwall which is a wall-mounted battery designed to provide backup power to a whole home. What can we make ourselves?

Completed 48V parallel battery system showing 16 installed packs (of 20), charging at 18.6A

Saturday, January 7, 2023

What's the difference between Ikea Bror shelving and workbenches?

It was time to reorganize my garage to make room for a new running treadmill, and the Ikea “Bror” line of shelving, drawers, workbenches, and storage solutions caught my eye. But from the website descriptions it was really hard to see just how sturdy certain items were, and why the workbench-style units cost so much more than the shelving. This is what I learned! I reviewed the Bror here because I couldn’t find any reviews that covered this type of info.

Fully assembled, expertly modeled, but poorly organized Bror storage system

Tuesday, May 17, 2022

How to get the most power out of the MPT-7210A boost charger

In normal solar power systems used to charge batteries, the solar panel voltage is higher than the battery voltage, and a traditional charge controller can then be used. Sometimes, you want to charge a battery that has a higher voltage than your panels, though, such as an ebike battery with a small solar panel. For that you need a boost charge controller or boost converter. Very few are available, and the most common seems to be the MPT-7210A "MPPT" charge controller. It can also be used to turn any DC power supply (even a free cast-off laptop charger) into a battery charger.

MPT-7210 boost charge controller
The MPT-7210 boost charge controller

I say MPPT in quotes because the MPT-7210A does not actually do Maximum Power Point Tracking. But it is still a valuable tool -- it is basically a programmable boost converter that has a setting for the minimum input voltage to use. That way, as it ramps up power and the voltage of your solar panels is pulled down, it does not just keep increasing current and collapse the input voltage to zero like a normal boost converter would do, but instead stops when the voltage is pulled down to your setpoint. See my previous post on DIY power stations for more discussion on how MPPT technology works.

Sunday, April 17, 2022

DIY portable solar generator power station

So that we could improve general preparedness and be more comfortable during power outages, I decided it was time to buy or potentially put together a portable power station like is so popular for camping/outdoors and emergencies these days (such as from Jackery or Goal Zero; see portable power stations at REI). They are also awkwardly called "solar generators" because they can be charged with solar panels, even though they are really just batteries with some outputs. I suppose the solar panel is the true generator.

I realized this was actually a perfect opportunity for DIY: commercial systems are quite expensive, and DIY would be achievable since the components are so modular. Can be as simple as battery, inverter, and charger. Let's do it!

Completed solar generator power station in a milk crate
Completed solar generator power station in a milk crate. Battery, charge controller, inverter, charger, 12V outputs, USB ports, and zippered pouches for cables and accessories

Wednesday, May 12, 2021

Fixing a broken solar-powered motion light

I love the solar-powered motion lights I have at my house but recently one started coming on during the daytime, then by night barely had any battery left, so something was definitely not working right.

Success! Battery-powered light now running from a wall USB charger

For fun I decided to open it up with my daughter to explore, and found that to my surprise, the inside was delightfully modular! Ripe for hacking. Maybe other models are similar inside? Let me know in the comments, please. I used the MITAOHOH MT-SL-82-4P which comes in a 4-pack for a shockingly low $20-$25.

(In general, it still blows my mind that any company can put products like this together for so cheap -- LEDs, solar panels, batteries, connectors, screws, wires, motion sensor, circuit board, and injection molded housings for $5 each, shipped to my door. Wild. That means negative externalities, unfortunately.)

Sad, dim solar light on during the daytime where it can't help anyone

Saturday, March 13, 2021

How to Fix Broken Power Button on the Saeco Vienna Plus

I’ve written a lot already about troubleshooting the Saeco Vienna Plus, but I still had a new problem happen to my machine the other day. Somehow the part of the front control panel holding the power button and switch had cracked, allowing the switch to be pushed all the way inside! Initially the switch only pushed in a small amount, so I removed the (no longer operational) button and was pushing the switch with my finger. Then it finally gave way and I was sunk.

Saeco Vienna Plus with cover removed

Missing power switch! It recessed into the machine.

The Solution

This can be fixed by opening up the machine and hot-gluing the switch in place!

Saturday, February 20, 2021

How to adjust Bowflex C6 and Schwinn IC4 water bottle holder position

The Bowflex C6 and Schwinn IC4 are great bikes to use with Peloton and other apps (see my analysis of using these bikes with apps), but the water bottle cage placement always had me bumping my knees on the top of my bottle. It probably inadvertently was influencing my form, so I wanted them moved!

Stock water bottle holder positions on the Bowflex C6

Here’s a quick fix: For those of you irritated by the placement of the water bottle holders on the Schwinn IC4 / Bowflex C6, you can make a bracket to move them pretty much anywhere you'd like!

Extender brackets installed to move bottle holders

Saturday, August 22, 2020

Data and details on the Bowflex C6 bike with Peloton app

Early in the 2020 pandemic I realized I probably wouldn’t be going to a gym anytime soon. I already had a treadmill (see my treadmill repair guide), dumbbells, and yoga mats, so we wanted to expand that into spin classes and officially cancel our expensive gym membership. A proper Peloton bike and subscription is pretty pricy, so I wanted to see if I could get most of the premium benefits for a fraction of the cost. Short answer: you can!

The Peloton app can be used with just about any spin bike, not just theirs. And to boot, the monthly cost when you do so drops from $39/mo to $13/mo (super wacky; I guess they assume you aren't locked into their ecosystem and so have competition).

First let's talk about the bike I chose and the setup, then get into the technical details of how it works and how to get the best power data out of it.

Home gym with Bowflex C6
Home gym with Bowflex C6 and iPad Pro (with SelectTech 552 dumbbells!). I cleaned up the power cable with gaffers tape.

So which bike?

You could go cheap (~$330), and it’ll work, but I wanted to mostly replicate the premium experience. A Peloton bike runs $2245 for the base kit with no accessories, but for $950 (hmm, now $999) you can get a Bowflex C6 with all the fixins (or even spend $100 less for the Schwinn IC4 which is the same thing with different accessories [no mat] and graphics. The Bowflex had a shorter lead time when I ordered. Sales rep for the parent company Nautilus confirmed they are mechanically the same.).

Saturday, July 18, 2020

How to Carry a Bike With Another Bike

For years I’ve wanted to tow a bike with another bicycle and had this towing solution tucked away in my garage. Now I finally want to make it available to everyone! What do you do when you have one person and need to move two bikes? Maybe you’re taking a bike to be repaired, or your dirt jumper to the bike park, or picking up your friend at the train station and don’t want to drive there. Or you left your bike at the bar and need to pick it up the next morning. I searched all over and couldn’t find a solution that was compact, easy, and did not involve disassembling the second bike, so I designed my own device to tow one bike behind another.

Updated 6/17/2023

Attached bike ready to tow, thanks to my assistant


Assembled bike towing system ready to ride
Ready to go! And it won't fall over!

Sunday, May 31, 2020

Saeco Vienna Plus Troubleshooting and Repair Ultimate Guide

The Saeco Vienna Plus is a super-automatic espresso machine that has been long discontinued, but is a workhorse for many people. I bought my unit refurbished in 2013 and it has been going strong since, saving my family thousands of dollars on lattes and espresso. To keep it running smoothly takes some maintenance of the brew group, along with occasional troubleshooting of the rest of the machine.

I already have a guide on how to open up the Vienna Plus to replace some parts, and what follows here is a more general troubleshooting guide.
The Saeco Vienna Plus espresso machine


Thursday, May 14, 2020

Troubleshoot your ProForm treadmill and replace the controller board

Like everyone else sheltering in place, we are mostly exercising at home, so having our treadmill working is more important than ever. I thought I’d do some preventative maintenance since we had bought the unit a few months ago used. In a fit of irony, the machine stopped working when I was checking the belt tension. Bummer. (Our model is the ProForm Crosswalk 545, PFTL6193.0S)

ProForm Crosswalk 545: decent treadmill, adorable girl

Thursday, October 24, 2019

Mac High Sierra fresh install errors on DIY Fusion Drive

As a follow-up to my installation of a DIY Fusion Drive on the 2011 Mac mini, there are some clarifications that have become useful a few years later on. I wanted to reformat the drives with a fresh operating system to pass along the computer to a family member, but was getting errors during installation.

The bottom line is that the install process does not work on a freshly-created Fusion Drive, but you can get around this by restoring a Time Machine backup onto the new Fusion Drive. Along the way, I discovered how to make a DIY Fusion Drive with a properly working recovery partition for troubleshooting in the future. The 2011 Mac mini only supports up to macOS High Sierra, though I suspect this is all resolved in Mojave/Catalina thanks to the luxuriously simple "diskutil resetFusion" command that I was able to use on a 2014 machine.

The issue is that the macOS High Sierra installer will give errors when doing a clean installation on a DIY Fusion Drive system, reporting either “macOS could not be installed on your system - invalid request” or “the installer resources were not found”. I got nervous because I was already in Recovery mode and a fresh install was failing... was the computer just toast now?!?

First comes the "invalid request" error
And if you reboot, you get "the installer resources were not found"
It turns out that the solution is to split the drives up, do a regular install onto the hard drive, use that to create a Time Machine backup, then rebuild the Fusion drive, and restore the backup (i.e. NOT a new install). Phew! (Thanks to this thread for pointing me in the right direction.) OK let’s do this in detail:

Wednesday, May 29, 2019

Engineering's Unwritten Rules

When I was at a large company managing diesel engine testing and development, my director passed along the following document he called "Engineering's Unwritten Rules". It really resonated with me because it solidified so many thoughts I had had for years.

I suspect many engineers have a similar story of documents like this being passed down through the (workforce) generations, because through some googling I found out that this was actually someone's summary of a series of three articles from 1944 by W. J. King, originally published in Mechanical Engineering magazine as "The Unwritten Laws of Engineering". (The full document has since been made available for purchase via ASME and includes some modern updates. A scanned older version is also available on Google Books.)

The Unwritten Rules of Engineering

Regardless, what I received years ago was a nice document on its own, though was surely modified by a few people over the decades. It focuses on the first portion of the original article series, on the successful behaviors of new engineers. It is presented here with minimal modification [with additions by Mike in brackets]:

Monday, November 26, 2018

Book Review—Thinking in Bets by Annie Duke

Thinking in Bets (Making Smarter Decisions When You Don't Have All the Facts) has been a wildly popular book, and I can see why. I was really excited about the prospects—who isn’t interested in better decision making? And as an engineer, finding that balance between gathering enough info and taking action is a key career skill we can all improve. Did this book deliver? Partly.

Wednesday, November 7, 2018

Soto Pocket Torch Troubleshooting for No Flame or Weak Flame

If your Soto Pocket Torch has stopped working, or the flame is small or weak, this guide can probably help you fix it -- it's likely not broken! The Soto PT-14SB torch is a great tool for camping, backpacking, and around the house for lighting candles and sealing rope ends. It uses disposable lighters instead of a fuel reservoir, so there is no fussing with refills and more fuel is always available at the local convenience store. I’ve seen two problems occur over the years: small/weak flames, and no flame at all.
A good flame!

Monday, January 1, 2018

Book Review—Eat That Frog! by Brian Tracy

Eat That Frog! is a pithy business success book that is effective and short. Basic premise: begin each day with the most important and difficult task that will have the greatest impact on your job and life. After that, everything will seem easy in comparison.

"It has been said that if the first thing you do each morning is to eat a live frog, you can go through the day with the satisfaction of knowing that that is probably the worst thing that is going to happen to you all day long.

Your “frog” is your biggest, most important task, the one you are most likely to procrastinate on if you don’t do something about it. It is also the one task that can have the greatest positive impact on your life and results at the moment."


Thursday, December 29, 2016

Make an Old-school two-way pager with Arduino

I made a 2-way pager with an Arduino, GSM shield, and LCD shield. I’ve found this idea to be more useful than at first glance—I designed it so it could be used by children in lieu of a real cell phone, or it could be used as an “SOS” button for someone working alone outdoors or even exercising (if it was a bit smaller). And for the last few weeks, this device has been always on in my living room where my wife and I leave silly messages for each other.

Summary: This project sends and receives text (SMS) messages via an arduino with cellular modem built into a small enclosure with an LCD display and simple control buttons. Full details of the design and build are on Hackster.io.

Could also be called "Most expensive pager made in 2016 ever."

Update: People seem to like this project! It has over 10,000 views, and was even featured on Hackster’s Handpicked Projects of the Week.


A Note on Affiliate Links

Please note that my site contains some affiliate links where I will earn a commission if you purchase the linked product. In 100% of the cases, these are for products/sites I have tried and/or own, or for books I have read. I do it for the learning experience and just for fun!